Step 1: Set up Your Development Environment Ensure that you have a code editor installed on your machine. GitHub Copilot seamlessly integrates with popular editors like Visual Studio Code and JetBrains IDEs.
Step 2: Install the GitHub Copilot Extension Visit the official website of your chosen code editor and search for the GitHub Copilot extension. Install the extension and follow any prompts or instructions provided.
Step 3: Enable GitHub Copilot Once the extension is installed, enable GitHub Copilot within your code editor. You may need to restart the editor or configure specific settings to activate the AI-powered coding assistant.
Step 4: Start Coding with GitHub Copilot With GitHub Copilot activated, you can begin experiencing its code generation capabilities. As you start typing code in your editor, Copilot will analyze your context and suggest code snippets to complete your statements.
Example 1: Auto-Completion Let’s say you’re working on a Python project and need to write a function that calculates the square of a number. Begin typing the function signature:
def calculate_square(number):
As you type, GitHub Copilot will analyze your code and suggest completing the function body:
def calculate_square(number):
return number * number
Example 2: Code Generation Suppose you’re writing JavaScript code and need to create a loop that iterates through an array. Start by typing the loop structure:
for (let i = 0; i < array.length; i++) {
GitHub Copilot will analyze the context and suggest completing the loop statement:
for (let i = 0; i < array.length; i++) {
const element = array[i];
// Rest of your code here
}
Step 5: Review and Modify Suggestions GitHub Copilot generates code suggestions based on patterns and conventions it has learned from a vast repository of code. While these suggestions can save time, it’s essential to review them for accuracy and alignment with your specific requirements. Modify the suggestions as needed to fit your codebase.
Step 6: Provide Feedback to GitHub Copilot As you use GitHub Copilot, you may encounter instances where the generated code snippets can be improved. GitHub encourages users to provide feedback on suggestions, helping to refine and enhance the AI’s capabilities. Use the provided mechanisms within your code editor to submit feedback on any corrections or improvements you’d like to suggest.
GitHub Copilot is an incredibly powerful coding assistant that can boost your productivity and streamline your coding workflow. By leveraging AI, it provides intelligent code suggestions and completions, helping you write code faster and more accurately. Remember to review and modify the suggestions to align with your specific requirements and provide feedback to help improve the tool further. With GitHub Copilot, you have an advanced coding companion by your side, revolutionizing the way you approach coding tasks. Happy coding!
Installation in Depth
In your JetBrains IDE, under the File menu for Windows or under the name of your IDE for Mac (for example, PyCharm or IntelliJ), click Settings for Windows or Preferences for Mac.
In the left-side menu of the Settings/Preferences dialog box, click Plugins. At the top of the Settings/Preferences dialog box, click Marketplace. In the search bar, search for GitHub Copilot, then click Install

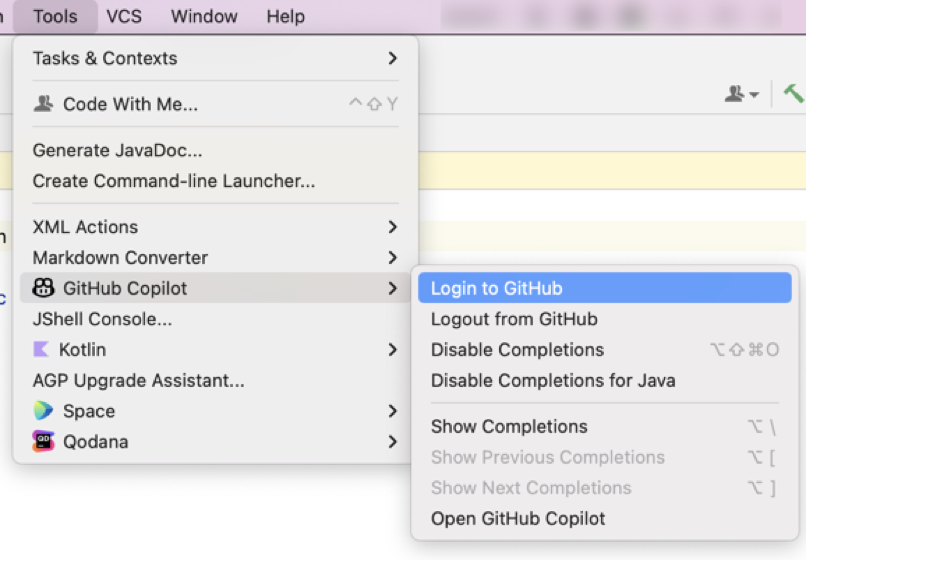
After GitHub Copilot is installed, click Restart IDE. After your JetBrains IDE has restarted, click the Tools menu. Click GitHub Copilot, then click Login to GitHub
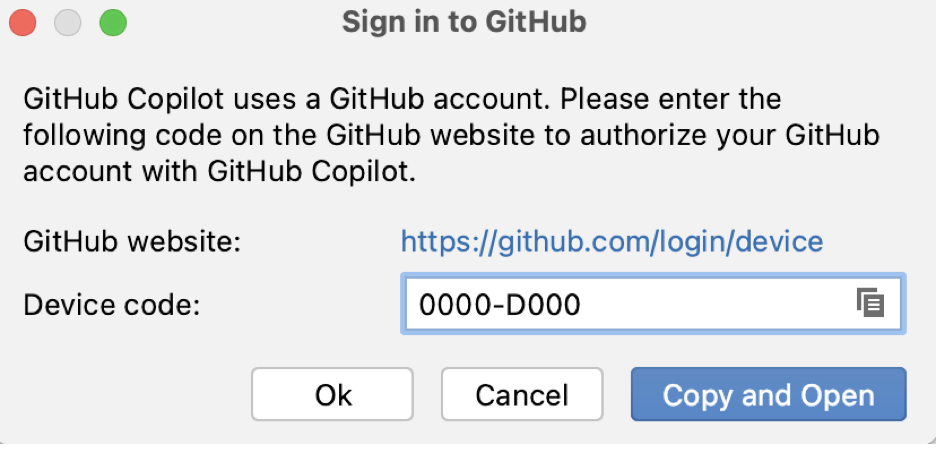
In the “Sign in to GitHub” dialog box, to copy the device code and open the device activation window, click Copy and Open
Links: https://docs.github.com/en/copilot/getting-started-with-github-copilot